How to install Apache PHP and MySQL on a Mac
The following instructions guide you thru the installation of the latest LAMP Stack (Apache, PHP and MySQL) on MacOS X Snow Leopard.
Sure, there are pre-packaged solutions like MAMP and MAMP Pro, but if you want to know the inner workings of a LAMP stack, you want to do the installation and configuration yourself.
Let’s get started. Here are the steps to install Apache, MySQL and PHP on a Mac OS X
- Download the installation image from MySQL website here. Then double-click to mount and open the disk image.
- Install MySQL Server by double clicking the package “mysql-5.1.*****.pkg” and follow the menu, accepting the default values, unless you want to change something and know exactly what you’re doing.
- Install MySQL Startup Item by double-clicking the package “MySQLStartupitem.pkg” and follow the menu.
- Install MySQL Preference Pane by double-clicking the file “MySQL.prefPane” and follow the menu. This item will simplify the management of your SQL Server. You can now use the “System Preferences” panel to start and stop the database server.
- Enable the php module in your Apache config file. You might know that Snow Leopard already ships with Apache 2.2 and PHP 5.3, but it needs a couple of tweaks to make it work smoothly. So, open /etc/apache2/httpd.conf and search for “php5_module”. Remove the comment (#) in front of the line, save and close the file, then restart Apache (sudo apachectl restart)
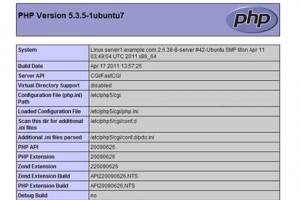
- Testing Apache/PHP. Let’s create an info file so we know what we got. Navigate to /Library/WebServer/Documents and create a file called phpinfo.php. Put the following line into the file, save and close. “<?php phpinfo(); ?>”. Now open your favorite browser and hit it (http://localhost/phpinfo.php). You should see a page like the one below, which shows you configuration details, modules enabled and other useful information.
- There is no php.ini out of the box (as you may have discovered by looking at the phpinfo page), but there is a sample file called “php.ini.default” which we’re going to use. Copy this file and save it as php.ini.
- Set the default time zone. As PHP 5.3 requires the timezone to be set, let’s do this inside php.ini, so we don’t have to worry about it anymore. You can always override it in your application’s bootstrap, if needed. Open /etc/php.ini and search for “[Date]”. Uncomment the line “date.timezone = ” and add your timezone. Check the php manual for acceptable values. (example: date.timezone = ‘America/Los Angeles’)
And that’s it. You should now have a fully functional LAMP stack with Apache, PHP and MySQL server.


Thanks for posting, this is by far the easiest procedure, compared to compiling source code and stuff.