Dual Boot Ubuntu and Vista

How do we dual boot Ubuntu and Vista, or Windows 7, where you have Windows Vista or Windows 7 installed first.
So you got a computer running Vista and like to dual boot between Vista and Ubuntu. The boot loader that ships with Vista can be a real pain. There are some nice utilities we can use to make that process a lot smoother for us. Here we go.
Create a partition
First you’ll need space for the Ubuntu installation. If you don’t already have a partition for it, right-click My Computer -> Manage -> Disk Management. Right-click on the main Vista partition and select Shrink Volume. The Shrink tool will assess how much space you can free up. (If you don’t have enough free space, Vista will not allow you to shrink it and the available space to shrink will be zero) You should have at least 12GB of free space for the new OS, if you don’t have that much it’s probably time for a new hard drive.
Prepare the USB drive
Next step is to prepare your installation USB drive, unless you already burned it on a CD/DVD. Follow our detailed instructions in this article. Insert the usb stick, or the CD/DVD and reboot. Check you system for booting from USB, usually you have to press a function key to select from possible boot media.
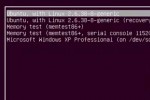
Follow the standard installation instruction during the Ubuntu install, choosing the newly created partition as target. You also can import accounts and personal folders from Vista, if the Ubuntu installer detects it. Everything else should be pretty straight forward. Once the installation is finished, let the system reboot and you will have a boot menu with listings for Ubuntu and Vista.
So far, all should be well and you can boot to Vista or Ubuntu using GRUB. Unless you want Vista to be in charge of the boot process, you’re done. The next step will explain how to revert back to the Vista boot loader and add Ubuntu as a choice of OS.
Boot and copy files
Boot to Ubuntu and copy the contents of the boot menu so that it is available in Vista. Open a terminal (Applications -> Accessories -> Terminal). Then open menu.lst (sudo gedit /boot/grub/menu.lst) and copy/paste it into a text document and save it onto the Vista partition. Alternatively you can send it by email or save it onto the USB memory stick. Then reboot into Vista.
Now we need the latest version of EasyBCD by Neosmart Technologies – download it here and install. Then, go to “Manage Bootloader” and select “Reinstall the Vista Bootloader”, then “Write MBR”.

This puts the Vista bootloader back into the MBR, but the machine will only boot into Vista at this time.To enable access to the Linux partition, the best option is to install NeoGrub. Go to “Add/Remove Entries”, go to the NeoGrub tab and select “Install NeoGrub”. This adds the “NeoGrub Bootloader” option to the Vista bootloader. Then choose Configure – this launches the NeoGrub menu.lst file, location at C:NSTmenu.lst. Use Notepad or Wordpad to open the file, and then paste in the boot entries that we copied from Ubuntu.

Save and exit, then reboot the machine. The system will come up with two boot options. Select “NeoGrub Bootloader” and then the Linux boot options will load. Choose the relevant option and the system boots into Ubuntu.


Thanks a lot for writing the post, it’s been very useful to me.
I had first installed Ubuntu 9.04 and then later on I installed Windows 7 RC, which obviously overwrote the Ubuntu loader. I first when into EasyBCD and tried adding back the Ubuntu through the Linux tab, no luck then I wanted to try NeoGrub and found you post.
I first installed NeoGrub and didn’t know much what to put in menu.lst so I booted the Ubuntu Live CD, found the /boot/grub/menu.lst on the Ubuntu HDD partition and copied it on top of the empty one in C:/NST/menu.lst, rebooted and choosing the new entry from the Windows 7 bootloader brought me to the Ubuntu entries. I’m sure with some tweaking you can probably change the menu.lst so that Ubuntu starts directly from the main boot entry, but that for another day…
Thank you for writing this.. it was the only way to get my machine working.
There is a slight problem.. if you copy the file to a usb stick, Linux has different line-end characters than windows, and if you open it up in ‘configure’ which uses notepad.exe, it will look like a mess. The way i did it was to open menu.lst in wordpad, which fixes the end-of-line problem, then ctrl-c ctrl-v into the ‘configure’ window in EasyBCD.
Alternatively you could use some linux or windows program to fix the end-of-line thing in the file itself.
Thanks again for posting this.. after hours of work this was the final trick that actually got the computer dual booting properly.
I don’t think this will work with 9.10 and up…, no menu.lst because of GRUB2 , thanks for the article though!!